
Creating a Dev VM should be simple and easy. No manual work to deploy configurations / tools every time we need a new distribution. For that purpose, we’ve used Vagrant (under MIT license) and, in this example, VirtualBox base package (under GPLv2).
Create Vagrant configuration file
We start by creating an initial Vagrant configuration file specifying the box we want to use.
We can either use a custom box (see how to create one here) or use an existing one from here.
To initialize the Vagrant file, we need to type the command vagrant init and the name of the box. In this case it’s a customized box:
# vagrant init example_centos7-box
We start the VM with the command
# vagrant up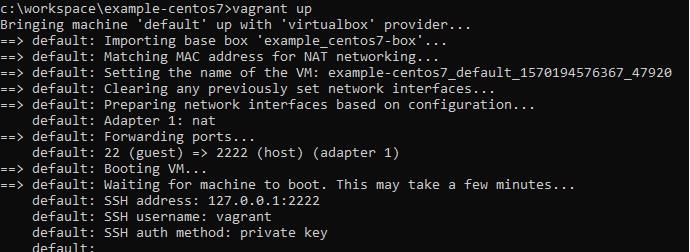
NOTE: We are using VirtualBox for this. So what if we wanted to use a different provider? In that case, we could specify it on the same command we’ve seen before, so we would end up with:
# vagrant up --provider hypervWe can check VirtualBox and see that the new VM is available and ready to be used
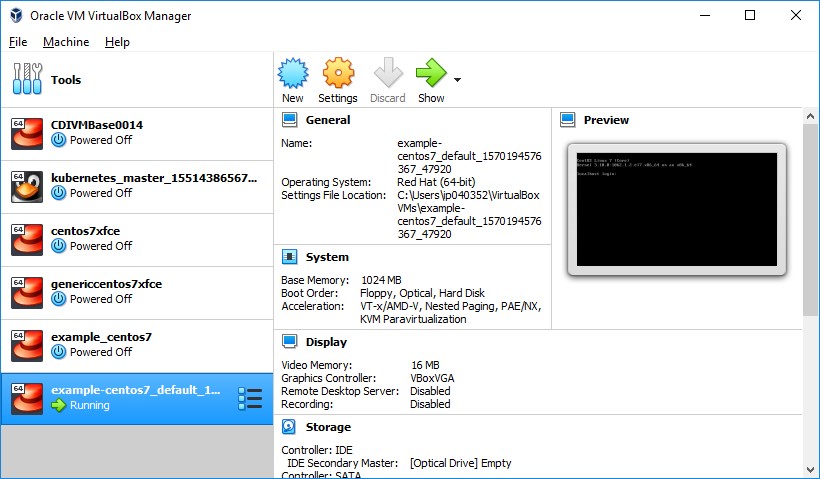
Figure 1: Oracle VM VirtualBox Manager with new VM already running
We now have a basic VM but, we will stop it for now. We still need to make changes to the configuration file. So, Vagrant has a command we can use for that:
# vagrant halt![]()
If we check VirtualBox now, we can see that the VM is not running. So, to completely destroy the VM, we use the command (confirm with ‘y’ when asked):
# vagrant destroy
VirtualBox will no longer list the VM.
Use Vagrant to configure the VM
Guest additions for VirtualBox
Vagrant can handle VirtualBox guest additions for us. To have that, we just need to install a plugin:
# vagrant auto upgrade guest additionsVagrant will check to see if the guest additions are already on the VM and, if yes, on which version. As a result, guest additions will be installed or upgraded as needed.
Vagrant project structure
We wanted a simple structure. So, we added the following folders to the VM root

Inside the “src” folder, we have set 3 others:
- The “config” contains all configuration files to copy to the VM
- The “scripts” hold the scripts to be executed during provisioning
- The “tar” has the specific tar versions for tools to install on the VM
Vagrant configuration file
To create the VM we want, we need to change the configuration file to set:
- A shared folder
config.vm.synced_folder "c:\\VMShare", "/vagrant", type: "virtualbox", automount: true- The VM name
vb.name = "myvagrantcentos7"- Memory to use
vb.memory = "8192"
vb.customize ["modifyvm", :id, "--vram", "64"]- Number of Cpus to use
vb.cpus = 2- Folders to copy for the VM installation
config.vm.provision "file", source: "src/tar", destination: "/tmp/" - Files to copy for the VM installation (ex.:)
config.vm.provision "file", source: "src/config/maven_settings.xml", destination: "/tmp/maven_settings.xml"- External scripts to install required tools (ex.:)
config.vm.provision "shell", path: "src/scripts/start.sh"NOTE: We need to verify the box authenticity when not using a customized one. Consequently, we need to specify the expected checksum
override.vm.box_download_checksum_type
override.vm.box_download_checksum
override.vm.box_url
NOTE: In some cases, we may not want Vagrant to manage guest additions for a specific VM. So, we do that by disabling the check in the configuration file with:
config.vbguest.auto_update = falseHere is the complete Vagrant configuration file:
# You can execute vagrant init on a folder to recreate a conf file with all comments
# All unnecessary comments on this file were removed to make it clearer
Vagrant.configure("2") do |config|
  # Every Vagrant development environment requires a box. In this case it’s our customization
  config.vm.box = "example_centos7-box"

  # Configure shared folder considering guest additions are already available
  config.vm.synced_folder "c:\\VMShare", "/vagrant", type: "virtualbox", automount: true

  # VirtualBox configuration
   config.vm.provider "virtualbox" do |vb, override|
  #   # Customize name to display on VirtualBox:
	 vb.name = "myvagrantcentos7"
  #   # Customize the amount of memory on the VM:
     vb.memory = "8192"
  #   # Customize the number of CPU on the VM:
	 vb.cpus = 2
  #   # Customize the amount of video memory on the VM:
     vb.customize ["modifyvm", :id, "--vram", "64"]
  #   # Check if Centos7 image is official release and one expected (if uncustomized box):
	 override.vm.box_download_checksum_type = "sha256"
     	 override.vm.box_download_checksum = "de768cf0180d712a6eac1944bd78870c060999a8b6617f8f9af98ddbb9f2d271"
     	 override.vm.box_url = "https://cloud.centos.org/centos/7/vagrant/x86_64/images/CentOS-7-x86_64-Vagrant-1905_01.VirtualBox.box"
   end

  # Generic initialization
  config.vm.provision "shell", path: "src/scripts/start.sh"
  # copy required tar for installation
  config.vm.provision "file", source: "src/tar", destination: "/tmp/"
  # Copy maven settings file
  config.vm.provision "file", source: "src/config/maven_settings.xml", destination: "/tmp/maven_settings.xml"
  # Copy glassfish domain file
  config.vm.provision "file", source: "src/config/glassfish_domain.xml", destination: "/tmp/glassfish_domain.xml"
  # Environment variables setting
  config.vm.provision "shell", path: "src/scripts/variables_install.sh"
  # java development kit 8 installation
  config.vm.provision "shell", path: "src/scripts/jdk8_install.sh"
  # java development kit 7 installation
  config.vm.provision "shell", path: "src/scripts/jdk7_install.sh"
  # glassfish 3.1.2.2 installation
  config.vm.provision "shell", path: "src/scripts/glassfish3_install.sh"
  # Maven installation
  config.vm.provision "shell", path: "src/scripts/maven_install.sh"
  # Firefox installation
  config.vm.provision "shell", path: "src/scripts/firefox68_install.sh"
  # Tomcat 8 installation
  config.vm.provision "shell", path: "src/scripts/tomcat8_install.sh"
  # Xfce installation
   config.vm.provision "shell", path: "src/scripts/xfce_install.sh"
  # Closing provisioning
  config.vm.provision "shell", path: "src/scripts/closure.sh"
end
External scripts definition
First of all, Vagrant allows inline shell scripts. It also allows external scripts. So, rather than using inline shell scripts, we preferred to use the later. These are created for each tool we want to include on the VM.
- JDK 7 and JDK 8
- Glassfish 3
- Maven
- Firefox as the browser
- Tomcat 8
- Xfce as the graphical environment
NOTE: All scripts start with #! /bin/bash
start.sh
The start.sh script guarantees that the system is up to date and adds some utilities required for the remaining scripts.
NOTE: We have set the default keyboard to the preferred layout when not using a custom box.
NOTE: The developers can add their own preferred IDE, text editor, …
#!/bin/bash

echo "Updating system..."
sudo yum update -y

echo "Adding user vagrant to vboxsf group (to access shared folder) ..."
sudo gpasswd -a vagrant vboxsf
sudo chown -R vagrant: /media/sf_vagrant

echo "Setting default keyboard..."
sudo localectl set-x11-keymap pt

echo "Installing wget..."
sudo yum -y install wget

echo "Updating metadata cache to install unzip..."
sudo yum -y makecache
echo "Installing unzip..."
sudo yum -y install unzip

echo "Initial script finished!"
variables_install.sh
The variables_install.sh script creates and adds the required environment variables to a new file. The file is then loaded and the environment variables made available every time the VM boots up.
#!/bin/bash

echo "Starting to set custom environment variables..."
echo "Creating custom file to add environment variables..."
sudo touch /etc/profile.d/custom.sh
echo "Granting permissions to file for user vagrant..."
sudo chown vagrant: /etc/profile.d/custom.sh
echo "Adding environment variables..."
sudo echo export PATH=/opt/apache-maven-3.5.2/bin:${PATH} >> /etc/profile.d/custom.sh

echo "Custom environment variables all set!"
jdk8_install.sh
The jdk8_install.sh script installs JDK 8 with the specified tar file, copied into the VM. The JDK 8 is installed first, to set it as the default java option.
#!/bin/bash

echo "preparing JDK 8 installation..."
echo "checking if jdk 1.8.0_152 is already installed and exit if it does..."
[ -d "/opt/jdk1.8.0_152" ] && exit 0

# move into opt folder
cd /opt/

# install JDK 8
echo "Setting JDK 8..."
echo "Untar JDK 8 into /opt/..."
sudo mv /tmp/tar/jdk-8u152-linux-x64.tar.gz /opt/jdk-8u152-linux-x64.tar.gz
echo "untar JDK 1.8.0_152 ..."
sudo tar xvf jdk-8u152-linux-x64.tar.gz
echo "removing JDK 1.8.0_152 tar file..."
sudo rm /opt/jdk-8u152-linux-x64.tar.gz
echo "granting required permissions to jdk1.8.0_152 folder..."
sudo chown -R root: jdk1.8.0_152
echo "making JDK 1.8.0_152 available in the system..."
sudo alternatives --install /usr/bin/java java /opt/jdk1.8.0_152/bin/java 1

echo "Java 8 installation finished!"
The java default option can be changed later with the command:
# sudo update-alternatives --config javajdk7_install.sh
The jdk7_install.sh script installs JDK 7 with the specified tar file, copied into the VM.
#!/bin/bash

echo "preparing JDK 7 installation..."
echo "checking if jdk 1.7.0_80 is already installed and exit if it does..."
[ -d "/opt/jdk1.7.0_80" ] && exit 0

# move into opt folder
cd /opt/

# install JDK 7
echo "Setting JDK 7..."
echo "copying JDK 1.7.0_80 tar into /opt/..."
sudo mv /tmp/tar/jdk-7u80-linux-x64.tar.gz /opt/jdk-7u80-linux-x64.tar.gz
echo "untar JDK 1.7.0_80 ..."
sudo tar xvf jdk-7u80-linux-x64.tar.gz
echo "removing JDK 1.7.0_80 tar file..."
sudo rm /opt/jdk-7u80-linux-x64.tar.gz
echo "granting required permissions to jdk1.7.0_80 folder..."
#sudo chown -R root: jdk1.7.0_80
echo "making JDK 1.7.0_80 available in the system..."
sudo alternatives --install /usr/bin/java java /opt/jdk1.7.0_80/bin/java 1

echo "Java 7 installation finished!"
glassfish3_install.sh
The glassfish3_install.sh script downloads, installs and configures glassfish 3 on the VM. The configuration is done with a pre-prepared file copied into the VM, containing the connections to existing databases.
#!/bin/bash

echo "preparing glassfish installation..."
echo "checking if glassfish is already installed and exit if it does..."
[ -d "/opt/glassfish3" ] && exit 0

cd /opt
echo "downloading glassfish 3.1.1.2 ..."
sudo wget http://download.oracle.com/glassfish/3.1.2.2/release/glassfish-3.1.2.2.zip
echo "installing glassfish 3.1.2.2..."
sudo unzip -q glassfish-3.1.2.2.zip
echo "cleaning up downloaded file..."
sudo rm glassfish-3.1.2.2.zip
echo "changing glassfish3 owner to vagrant..."
sudo chown -R vagrant: glassfish3

echo "Replace glassfish domain xml file ..."
sudo mv /opt/glassfish3/glassfish/domains/domain1/config/domain.xml /opt/glassfish3/glassfish/domains/domain1/config/domain.xml.bkp
sudo mv /tmp/glassfish_domain.xml /opt/glassfish3/glassfish/domains/domain1/config/domain.xml

echo "Glassfish installation finished!"
maven_install.sh
The maven_install.sh script downloads, installs and configures maven 3.5.2 on the VM. The configuration is done with a pre-prepared file copied into the VM, containing the settings to be used.
#!/bin/bash

echo "Setting maven..."

mvn -version && exit 0

echo "Downloading maven 3.5.2 ..."
sudo wget http://archive.apache.org/dist/maven/maven-3/3.5.2/binaries/apache-maven-3.5.2-bin.tar.gz -O /tmp/apache-maven-3.5.2-bin.tar.gz

echo "Untar downloaded file..."
sudo tar -xvzf /tmp/apache-maven-3.5.2-bin.tar.gz -C /opt/

echo "Replace maven settings file ..."
sudo rm /opt/apache-maven-3.5.2/conf/settings.xml
sudo mv /tmp/maven_settings.xml /opt/apache-maven-3.5.2/conf/settings.xml
sudo mv /tmp/custom_config.sh /etc/profile.d/custom.sh

echo "Maven installation finished!"
firefox68_install.sh
The firefox68_install.sh script downloads and installs Firefox ESR 68 on the VM.
#!/bin/bash

echo "preparing firefox installation..."
echo "checking if firefox is already installed and exit if it does..."
[ -d "/opt/firefox" ] && exit 0

echo "downloading firefox 68 ESR..."
sudo cd /opt/
sudo wget http://ftp.mozilla.org/pub/firefox/releases/68.0esr/linux-x86_64/en-US/firefox-68.0esr.tar.bz2

echo "untar firefox 68 ESR..."
sudo tar xvjf firefox-68.0esr.tar.bz2 -C /opt

echo "cleaning up downloaded file..."
sudo rm firefox-68.0esr.tar.bz2

echo "Firefox installation finished!"
tomcat8_install.sh
The tomcat8_install.sh script downloads and installs Tomcat 8 on the VM.
#!/bin/bash

echo "preparing tomcat 8 installation..."
echo "checking if tomcat 8 is already installed and exit if it does..."
#[ -d "/opt/apache-tomcat-8.5.47" ] && exit 0

echo "downloading tomcat 8 ..."
cd /opt/
sudo wget http://www-us.apache.org/dist/tomcat/tomcat-8/v8.5.47/bin/apache-tomcat-8.5.47.tar.gz

echo "untar tomcat 8 ..."
sudo tar -zxvf apache-tomcat-8.5.47.tar.gz

echo "setting permissions ..."

sudo chown -R vagrant: /opt/apache-tomcat-8.5.47

echo "cleaning up downloaded file..."
sudo rm apache-tomcat-8.5.47.tar.gz

echo "Tomcat 8 installation finished!"
xfce_install.sh
The xfce_install.sh script installs a graphical environment on the VM. We have chosen xfce to have a lightweight desktop environment.
#!/bin/bash

echo "preparing xfce installation..."

echo "installing epel-release required for xfce..."
sudo yum -y install epel-release

echo "installing xfce desktop environment..."
yum -y groupinstall x11
yum -y groups install "Xfce"

echo "setting graphical environment as default..."
systemctl set-default graphical.target

echo "Xfce installation finished!"
closure.sh
The closure.sh script closes the installation, clearing unwanted files and shutting down the VM.
#!/bin/bash

# remove previously created folder and files
sudo rm -R /tmp/tar/
sudo rm /tmp/apache-maven-3.5.2-bin.tar.gz

echo "Finished cleaning up!"

echo "Shuting down!"
sudo shutdown -h now
Recreating the VM
Once we have finished the configuration file, we can finally recreate the VM with:
# vagrant upThere is no need to halt and destroy the VM every time we want to add a new tool with Vagrant. We just need to change the configuration file and run vagrant up with provision:
# vagrant up --provisionBooting the new VM
Now that we have created the VM, we can go to VirtualBox and start our VM. There, we can find it with the name and definitions specified in our configuration file
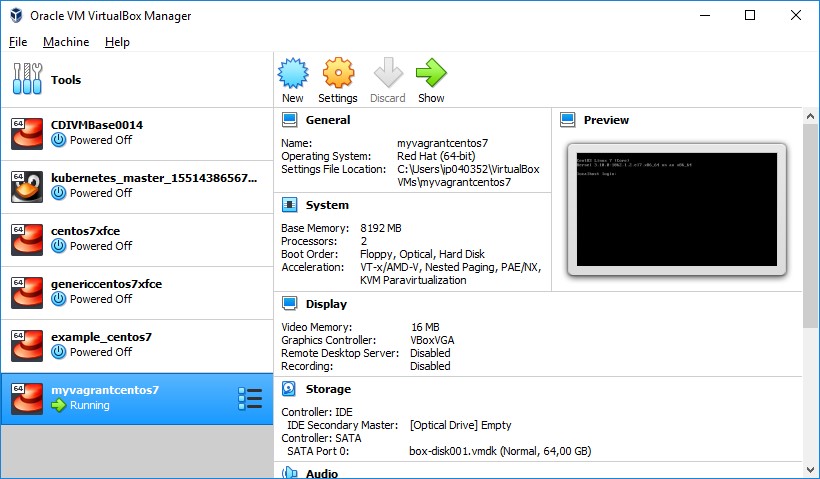
Figure 2: Oracle VM VirtualBox Manager with new VM running
We login to the VM with vagrant/vagrant. The first time we login, we should select the Xfce Session environment.
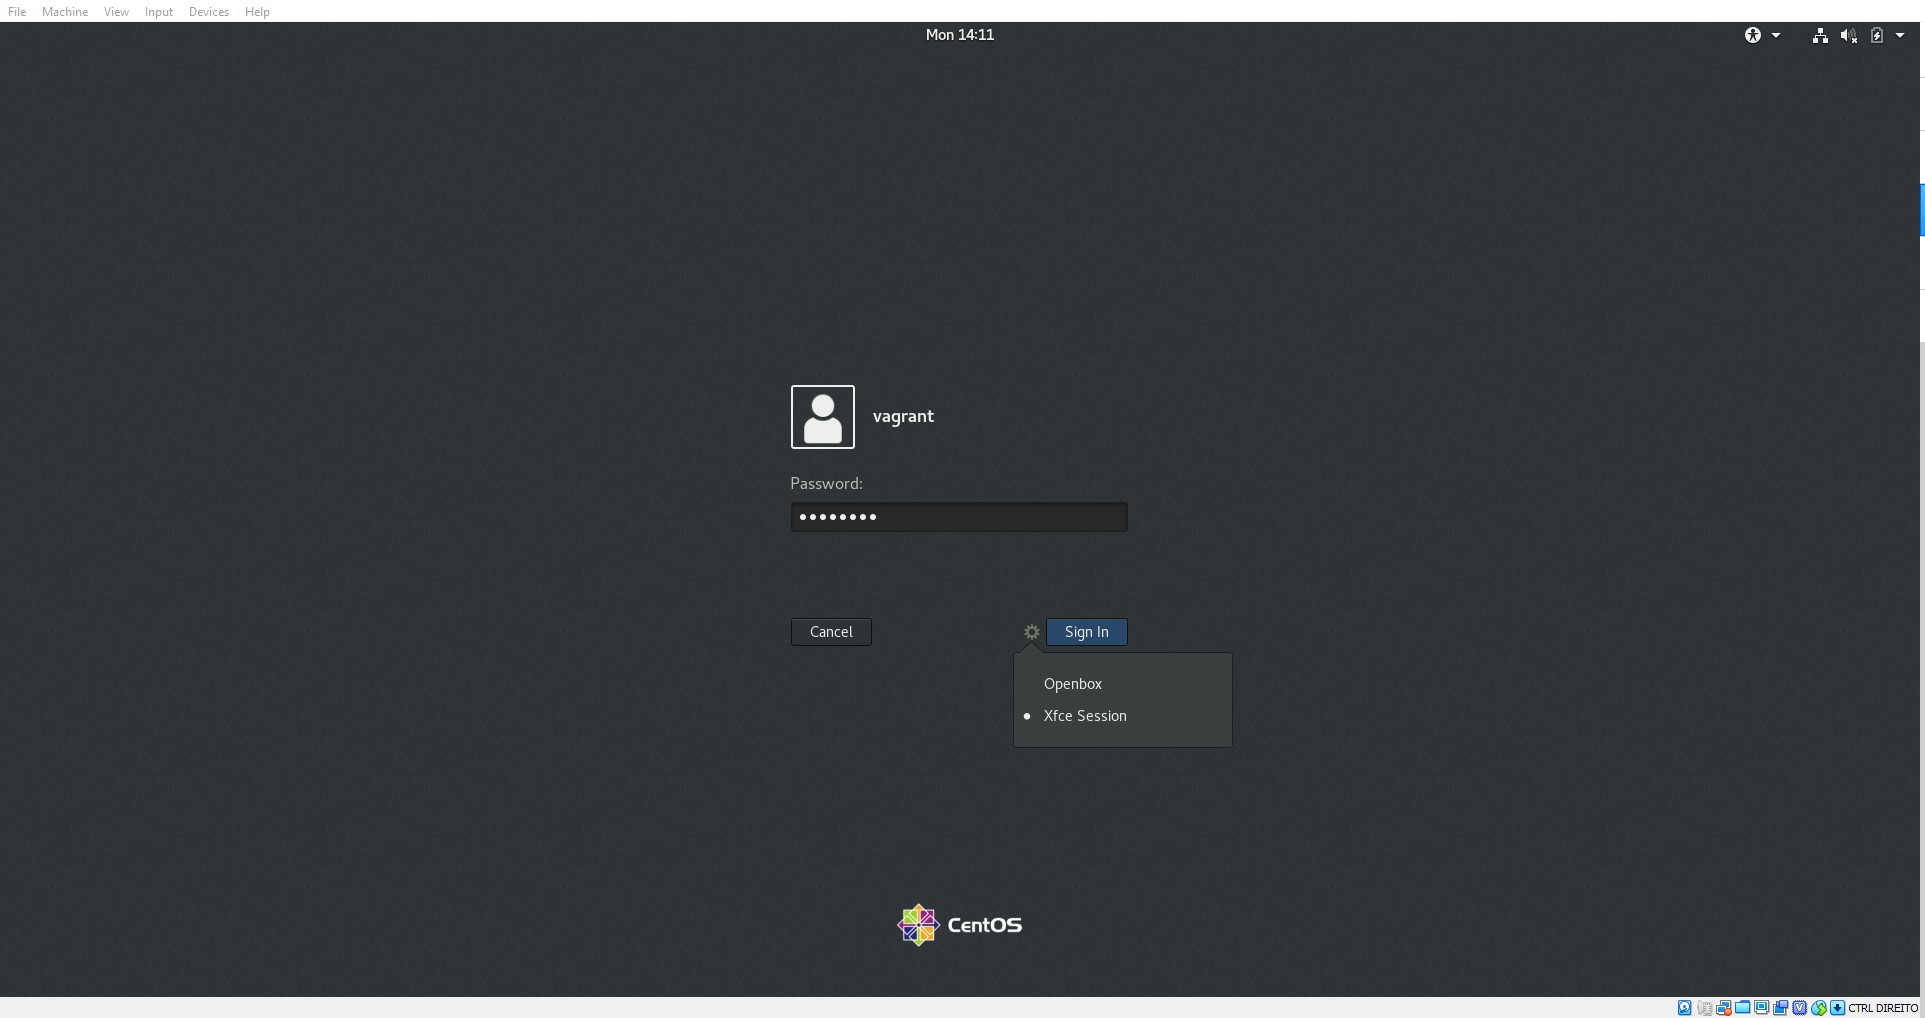
Figure 3: VM login screen
In conclusion
The development VM is still missing some required tools for a developer to start working, but, we have opted to offer them the possibility to choose the remaining tools to install. For example, the IDE.
We are also building a repository with installation scripts for other tools. That way, the developers can choose the ones they want and easily include them on their own Vagrant configuration file to provision the VM just the way they want!